How to Prepare a Large Canvas for Oil and Cold Wax Painting
One of the most common questions I get is how to prepare a large canvas for cold wax and oil painting. While rigid surfaces like wood panels are generally recommended, I still love working on large canvases for my portrait paintings. In this post, I’ll walk you through the exact steps I take to prepare my canvas to ensure it’s sturdy and ready for layering with cold wax and oils.
Step 1: Choosing the Right Canvas

The type of canvas you use makes a big difference. Since cold wax and oils require a strong surface, I always use a thick, gallery-wrapped canvas with a sturdy frame. The thicker sides provide more stability and prevent the canvas from warping under the weight of the paint.
Step 2: Tightening Your Canvas with Wooden Wedges

When you purchase a canvas, you might notice small wooden pieces included in the packaging. These are wooden wedges, and they help keep your canvas stretched and tight. Here’s how to use them:
Insert the wedges into the slots at the back of the frame, with the pointy ends facing inward.
Use a hammer to gently tap them into place.
This step is crucial because a properly stretched canvas prevents sagging, especially when applying layers of cold wax and oil.
Step 3: Applying Two Layers of Gesso

Even if a canvas is pre-primed, I always apply two additional layers of universal acrylic gesso. This helps create an even surface and ensures that the paint adheres properly.
Apply gesso with a brush, a palette knife, or a bowl scraper.
If you like texture, you can create marks in the gesso layer using a texture tool.
Let each layer dry completely before adding the next one.
Step 4: Painting the Sides Black
Before I begin painting, I paint the edges of my canvas black. I find that this simple step helps me get into the painting mindset and eliminates the distraction of bright white edges.
I start with a student-grade black acrylic paint, mixed with a little water.
Once my painting is finished, I apply a final coat of high-quality black acrylic paint (such as Golden) for a clean and polished look.
Do you also paint your edges at the start of your process, or do you prefer to do it at the end? Let me know in the comments!
Step 5: Adding an Acrylic Underpainting

To build up layers without using too much expensive oil paint and cold wax, I always start with an acrylic underpainting.
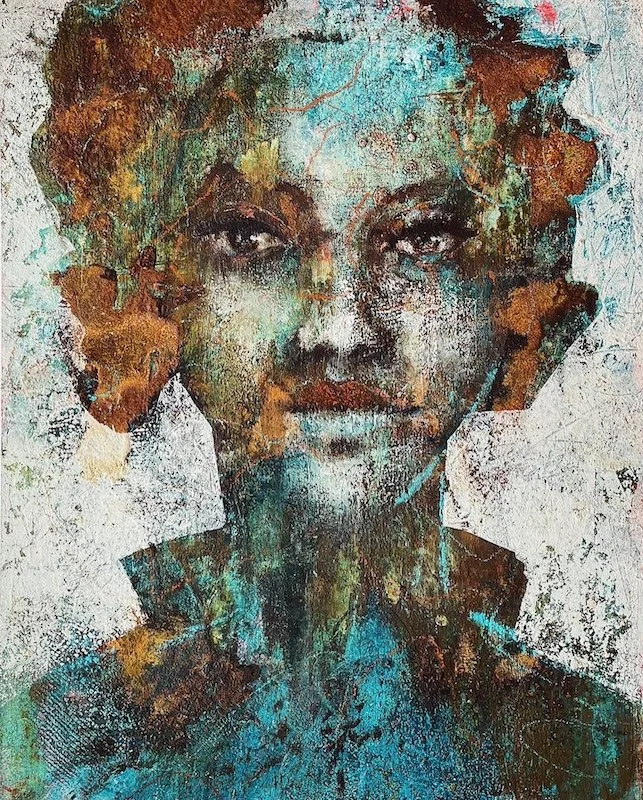
First, I paint a dark base layer. This ensures that when I scrape back into the cold wax layers later, I won’t expose raw white canvas but rather a rich, dark tone. I often use Prussian Blue for this layer
Next, I add a layer of fun colors—often gold, turquoise, pink, or green. These colors might be covered up, but they’ll shine through in certain areas, adding depth and interest to the final painting.
I use a bowl scraper to apply the acrylics, sometimes incorporating textures with tools like embossed wallpaper or bubble wrap.
I always say: love your layers, even the base ones!
Step 6: Starting with Cold Wax and Oils

Once the acrylic layer is completely dry, it’s time to start painting with cold wax and oils. I often start my cold wax and oil layer with student grade paint but I always finish with the artist grade paints. More about the quality of your paints here
If the acrylic layer feels too smooth, you can lightly sand it to add some tooth.
I mix my oil paint with cold wax medium and add a bit of Gamblin Solvent-Free Gel to increase flexibility.
Using a large bowl scraper, I spread the first layer of paint across the canvas
I add expressive marks with R&F pigment sticks and build up my layers gradually, incorporating texture and palette knife work over time.
The Texture Lab
If you enjoy exploring texture and mixed media, you might also love The Texture Lab, my upcoming membership. It will be a place for creative experiments, lessons, and inspiration. Join the waitlist HERE
Final Thoughts
And that’s how I prepare my large canvases for cold wax and oil painting! These steps ensure a stable surface and help create depth in my artwork from the very first layer.
Do you use a similar process, or do you have your own methods for preparing a canvas? Let me know in the comments!
If you found this helpful, be sure to subscribe to my YouTube channel for more cold wax and oil painting tips. There are already many videos available, and more are on the way!
Happy painting! 🎨
As always, don’t hesitate to ask me questions, I would love to connect with you!💙